Ultimate Member gives you a complete membership system. Elementor gives you a visual page builder. On their own, each is powerful. Together with the right addon you can build a professional membership site with a branded login page, a searchable member directory, and custom profile pages without writing a line of code.
This tutorial covers everything: setting up Ultimate Member, styling your login and register forms in Elementor, building a member directory, and using Pro widgets like the sortable table, user carousel, and profile page builder.
Plugins used in this tutorial:
- Ultimate Member (free)
- Elementor (free version is sufficient)
- Ultimate Member Widgets for Elementor (free + Pro)
You can preview all widgets live at demo.userelements.com.
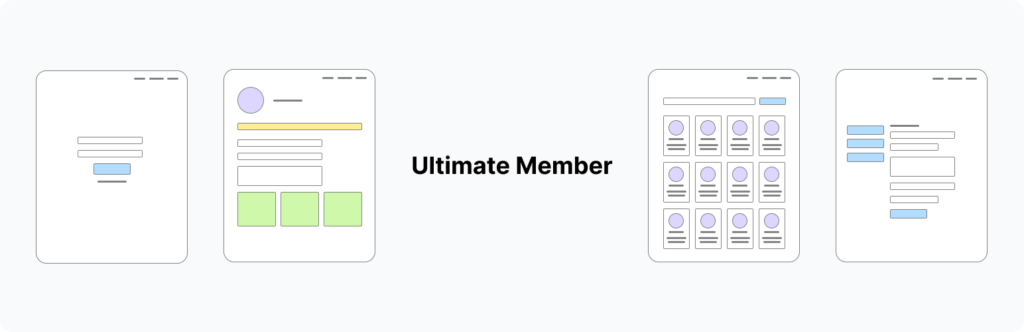
What You Can Build
Ultimate Member Examples
Before diving into setup, here is what the plugin gives you at each tier:
Free Widgets (8 total)
| Widget | What It Does |
|---|---|
| UM Login Form Styler | Style the UM login form visually inside Elementor |
| UM Register Form Styler | Style the UM register form inside Elementor |
| UM Password Reset Styler | Style the password reset page to complete the auth flow |
| UM User Directory Grid | Searchable, filterable member directory with AJAX search |
| WordPress User Directory | Works without Ultimate Member — any registered WP users |
| User Profile Flip Cards | Hover-to-flip cards for team pages and showcases |
| User Avatar Display | Standalone avatar widget for profile page templates |
| User Meta Fields | Display any UM profile field on a member’s profile page |
| User Profile Name | Display name in any format with full typography controls |
Pro Widgets
| Widget | What It Does |
|---|---|
| Sortable User Table | DataTable with clickable column sort and CSV export |
| User Carousel | Touch-friendly Swiper slider for featured members |
| Advanced Filter Widget | Standalone sidebar filter panel, unlimited fields |
| Live Search Widget | AJAX search you can place anywhere, independent of the grid |
| Faceted Search Directory | Multi-criteria live filtering with real-time AJAX refresh |
| 2-Column / 3-Column Layouts | Multi-column directory layouts |
| Zigzag Layout | Alternating editorial-style member layout |
| Account Page Styler | Style the UM account page tabs in Elementor |
| Profile Page Builder | 9 widgets for a fully custom UM profile page in Elementor |
| Native UM Directory Styler | Visual control over the default UM member directory shortcode |
Step-by-Step Installation Guide
Part 1: Setting Up Ultimate Member
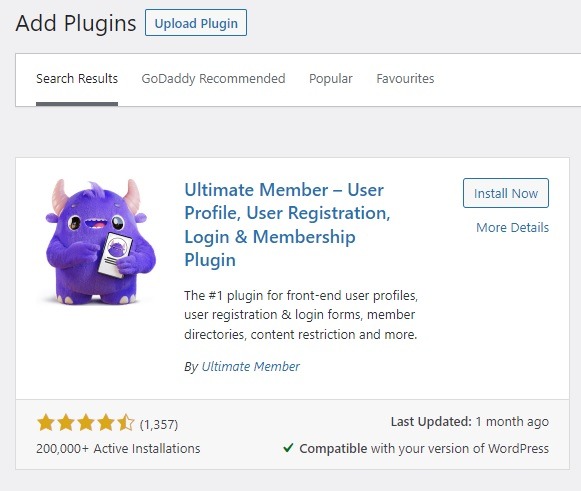
First, you need to install the Ultimate Member WordPress plugin.
- Log in to your site and go to the WordPress Dashboard
- Go to Plugins > Add new
- Search for “ultimate member”
- Please install and activate it
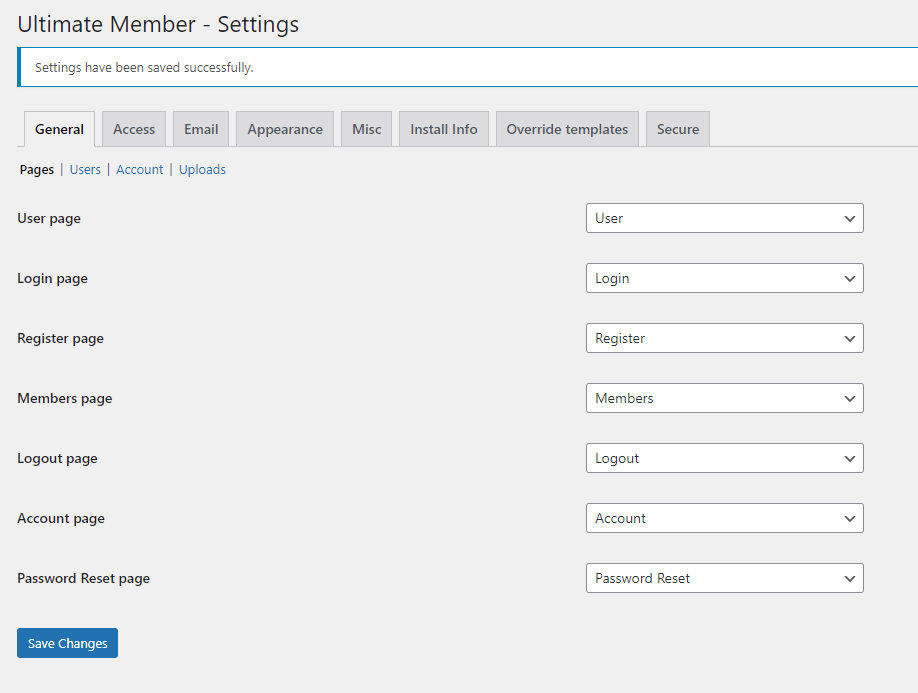
On first activation, Ultimate Member will prompt you to create its default pages.
Click Create Pages. This generates seven pages automatically:

When you activate Ultimate Member, it will install 7 default pages ( Login, Register, User, Account, Member, Logout & Password Reset pages). Follow this tutorial if you don’t see the page creation modal.
Click Create Pages. This generates seven pages automatically:
| Page | What It Does | Shortcode |
| Account Page | Allows users to reset passwords | [ultimatemember_account] |
| Password Reset Page | Allows members to log in | [[ultimatemember_password] |
| Logout Page | Allows logged-in users to log out of the website. | N/A |
| Register Page | Allows visitors to register | Shortcode found on Ultimate Member > Forms |
| Login Page | Displays a list of users | Shortcode found on Ultimate Member > Forms |
| User Page | Outputs user profile with avatar, profile cover, and other custom fields. | Shortcode found on Ultimate Member > Forms |
| Members Page | Displays list of users | Shortcode found on Ultimate Member > Member Directory. |
Important: Exclude these pages from your caching plugin. Cached UM pages break login redirects, form submissions, and directory queries.
Step 2 – Create Your Registration Form
Now you have to select a default role for newly registered users. For example, when someone registers to your directory or membership site, what access do you want to give to them?
Creating a Registration Form
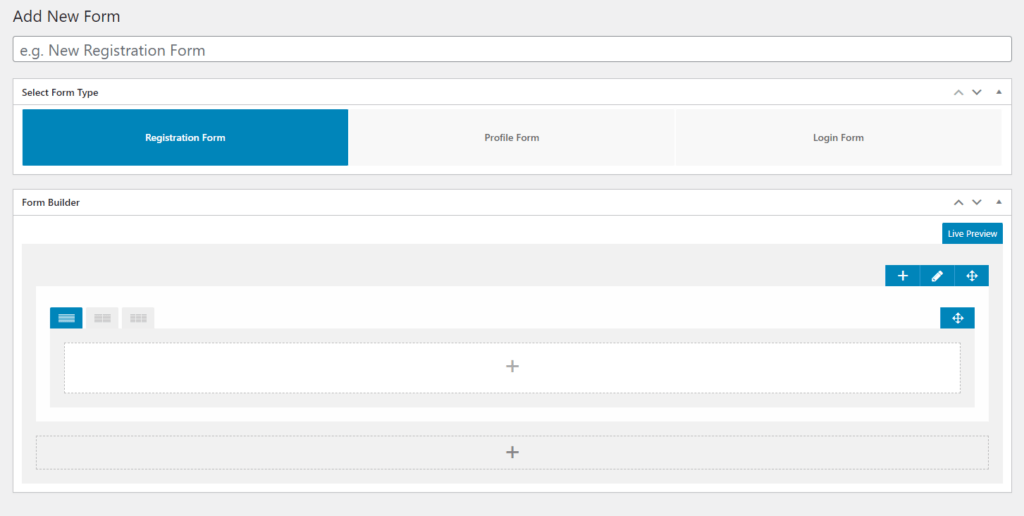
Ultimate Member creates a “Default Registration” form automatically. To create a custom form with specific fields:
- Go to Ultimate Member → Forms → Add New
- Set Form Type to Registration Form
- Click + in the Form Builder to add fields
- Choose from 23 field types: text, dropdown, multi-select, image upload, file upload, date, URL, and more
- Save and copy the shortcode (e.g.
[ultimatemember form_id="123"])
Default role on registration: Go to Ultimate Member → Settings → Appearance → Registration Form and set the Registration Default Role. This role is assigned to every new registrant automatically.
Step 3 – Configure the Member Directory
- Go to Ultimate Member → Member Directories → Edit → Members
- Under General Options, set which User Roles to Display
- Set Profiles per page (default is 12)
- Make sure “Enable Members Directory” is checked under Settings → General → Users
- Save
The default directory uses UM’s own shortcode. The Elementor directory widget (covered below) is a separate, more powerful version.
Step 4 – Configure User Roles
Ultimate Member lets you create custom roles with specific permissions:
- Go to Ultimate Member → User Roles → Add New
- Set the role title and priority
- Configure permissions per role:
| Permission Area | Options |
|---|---|
| Admin | WP admin access, edit/delete other accounts |
| Profile | Edit own profile, delete own account |
| Profile Access | View others’ profiles, private profiles |
| Registration | Status after registration (auto-approve, pending review, email verification) |
| Login | Redirect after login |
| Content | Role-based content restriction |
Content restriction is one of Ultimate Member’s strongest features. You can restrict entire pages, individual posts, or specific sections using the shortcode:
[um_show_content roles="member"]
</span></span><span>  This content is only visible to members.
</span><span>[/um_show_content]
Part 2: Styling Your Login Page in Elementor (Free)
This is the most impactful thing you can do with the plugin. The default Ultimate Member login page is completely unstyled. The UM Login Form Styler widget replaces it with a fully branded, visually designed login form — in under five minutes.
Step 1 – Open Your Login Page in Elementor
Navigate to the login page Ultimate Member created, and click Edit with Elementor.
Step 2 – Add the Login Form Styler Widget
In the Elementor widget panel, search for UM Login Form Styler. Drag it onto the canvas. The live Ultimate Member login form renders immediately inside the editor.

Step 3 – Style Every Element Visually
From the Style tab, you have full control over:
- Form wrapper — background color or image, padding, border radius, box shadow
- Input fields — border, background, text color (Normal and Focus states separately)
- Field labels — typography, color, spacing
- Submit button — background, text, border, radius, hover state
- Secondary button (Register / Forgot password links) — full independent styling
- Error and notice messages — color, background, border
- Footer links — typography and color
From the Content tab, you can:
- Switch between the Login form and Register form with one click
- Choose which specific UM form to display (if you have multiple)
- Set redirect URL after login
Step 4 – Style the Register Form
Add the UM Register Form Styler widget to your registration page. The same style controls are available. Style both pages to match, and your members experience a consistent, branded flow from registration through to login.
Step 5 – Style the Password Reset Page
Add the UM Password Reset Styler to your password reset page. This completes the authentication flow. All three pages — login, register, password reset — can be styled to match perfectly.
Result: A cohesive, branded authentication experience that matches your site design — no CSS file, no child theme.
Part 3: Building a Member Directory in Elementor (Free)
Step 1 – Install the Widgets Plugin
Go to Plugins → Add New, search for “Ultimate Member Widgets for Elementor”, and activate it. Widgets appear in the Elementor panel under two categories: User Directory and UM Profile Forms.

Step 2 – Add the User Directory Grid Widget
Open any Elementor page and drag the UM User Directory Grid widget onto the canvas. You immediately see a live preview of your members.
Step 3 – Configure the Query (Content Tab)
| Setting | Description |
|---|---|
| User Roles | Which roles to include in the directory |
| Show Only Approved Users | Skips pending and rejected UM accounts |
| Users Per Page | How many cards to show per page/load |
| Order By | Display name, registration date, last login, post count, or any custom meta field |
| Order | Ascending or descending |
Step 4 – Choose a Layout
Free layouts:
- Card Grid — responsive photo grid, 1 to 6 columns
- List — horizontal rows, better for data-heavy directories
Pro layouts:
- Sortable Table — column-sortable DataTable with global search
- Carousel — Swiper-powered slider
- 2-Column — balanced two-column layout
- 3-Column — dense three-column grid
- Zigzag — alternating left-right editorial layout
Step 5 – Configure Fields and Filters
In the Fields section, select which user meta fields appear on each card: name, avatar, bio, role, location, social links, phone — any UM profile field.
In the Filters section:
- Enable AJAX live search — results update as visitors type, no page reload
- Enable meta field filters — visitors can filter by role or any custom field (up to 2 filter fields in the free version, unlimited in Pro)
- Enable Filter Persistence — filter state is saved in localStorage, so refreshing the page keeps the current filter active
- Enable URL Parameters — filter state is reflected in the URL, making filtered directory views shareable
Step 6 – Set Pagination
Three options are available:
- Numbered Pages — traditional page numbers
- Load More Button — appends next page below current results on click
- Infinite Scroll — loads next page automatically as visitors scroll
Step 7 – Style the Directory (Style Tab)
Style controls cover every element:
- Card background, border, border radius, shadow
- Avatar size, border, radius
- Name typography and color
- Meta field labels and values — size, color, spacing
- Pagination buttons — background, color, hover states
- Search input and filter buttons
Part 4: Pro Widgets Overview
Sortable User Table

The table widget displays your members in a DataTables-powered grid. Visitors click any column header to sort — by name, registration date, role, or any custom meta field. A global search bar filters across all visible columns simultaneously. One-click CSV export downloads the current filtered member list.
Ideal for: HR directories, association member lists, admin-facing member management pages.
User Carousel

Swiper.js-powered slider for your members. Touch-friendly on mobile. Supports auto-play, loop, and any combination of profile fields per slide. Great for homepage featured members, alumni spotlights, and testimonial sections.
Advanced Filter Widget
A standalone filter panel you can place anywhere on the page — in a sidebar, above the directory, or in a separate Elementor column. Supports dropdowns, checkboxes, and radio buttons. Unlimited filter fields. Connects to any directory grid widget on the same page.
Faceted Search Directory

Multi-criteria live filtering with real-time AJAX refresh. When visitors select multiple filter values simultaneously, the directory updates instantly. The most powerful search experience for complex member communities with many filterable attributes.
Multi-Column and Zigzag Layouts
2-column demo | 3-column demo | Zigzag demo
Three additional directory layouts for full design flexibility. The zigzag alternates image and text left-right for an editorial, magazine-style look. Two-column and three-column layouts give more horizontal density than the standard card grid.
Account Page Styler (Pro)
Style the Ultimate Member account page directly inside Elementor. The account page has four tabs — General, Password, Privacy, and Notifications — and all four are styleable independently. Every member visits this page when they manage their profile, making it high-impact for brand consistency.
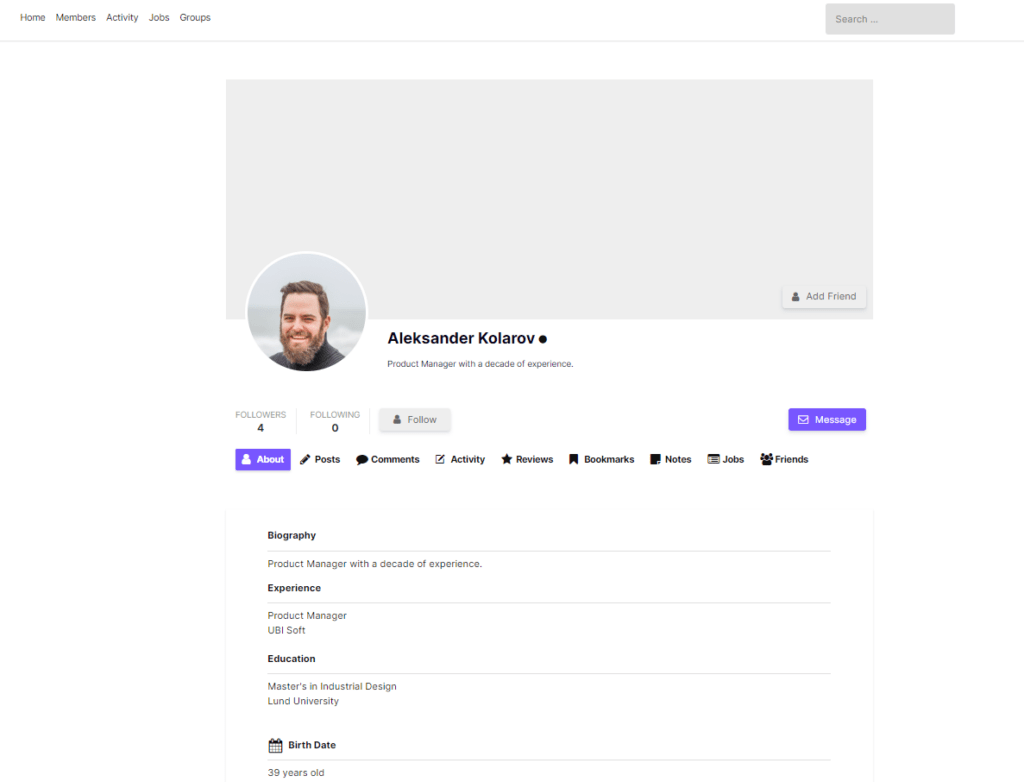
Profile Page Builder (Pro)
The most advanced Pro feature. Nine dedicated Elementor widgets replace the default Ultimate Member profile template entirely:

| Widget | What It Renders |
|---|---|
| Profile Cover Photo | Full-width cover image with upload controls |
| Profile Header | Avatar, name, role, action buttons |
| Profile Bio | Member’s bio/description field |
| Profile Meta Fields | Selected custom UM fields in label+value format |
| Profile Social Links | Social media icons linking to UM social fields |
| Action Bar | Follow, message, and connect buttons |
| Profile Completion Bar | Progress indicator for profile completeness |
| Profile Tabs | Custom tab navigation for profile sections |
| Profile Body | The main UM profile form content area |
You build the profile page exactly like any other Elementor page — drag, drop, configure, style. This is the only plugin that gives you full drag-and-drop control over the Ultimate Member profile page layout without overriding PHP templates.
Part 5: Building a Custom Profile Page in Elementor (Pro)
Step 1 – Create a New Elementor Template
Go to Templates → Add New in Elementor and choose Single Page. This template will be applied to all UM user profile pages.
Step 2 – Build the Profile Layout
Drag profile widgets from the UM Profile Forms panel category:
- Add a full-width section for the Profile Cover Photo widget
- Below it, add a section with the Profile Header widget — this renders the avatar, display name, role badge, and action buttons
- Add a two-column section: Profile Bio on the left, Profile Meta Fields on the right
- Add Profile Social Links below
- Add Profile Tabs for any additional profile sections
- Add Profile Body to render the main UM profile form
Step 3 – Style Each Widget
Every profile widget has full Elementor Style tab controls. Colors, typography, spacing, border radius, and background are all configurable visually.
Step 4 – Set the Template Conditions
In Elementor, set the template to apply to Ultimate Member → User Profile pages. All profile pages site-wide now use your custom layout.
Part 6: Performance Tips
Enable the UM custom meta table. Go to Ultimate Member → Settings → Misc and enable “Enable custom table for usermeta.” This significantly speeds up member directory queries on large sites.
Exclude UM pages from caching. Exclude the login, register, account, password reset, and member directory pages from your cache plugin (WP Rocket, LiteSpeed Cache, etc.).
Exclude the plugin JS from minification. If you see broken directory behavior after minification, exclude wp-content/plugins/ultimate-member-widgets-for-elementor/assets/js/ from your caching plugin’s JS processing.
Limit images for large directories. On directories with many members, disable cover photos on cards and use avatars only. This reduces image load significantly on the initial page render.
Part 7: Hiding Member Profiles from Search Engines
If you are building a private membership site and do not want member profile pages indexed:
- Go to Ultimate Member → Settings → General → Users
- Enable “Avoid indexing profile by search engines”
You can also set this per user role from Ultimate Member → User Roles, giving you granular control — public members can be indexed while private or premium roles are not.
Summary: What Each Plugin Does
| Task | Plugin |
|---|---|
| User registration, login, profiles, member directory | Ultimate Member (free) |
| Visual page builder | Elementor (free) |
| Style login, register, password reset forms in Elementor | Ultimate Member Widgets for Elementor (free) |
| Searchable member directory grid in Elementor | Ultimate Member Widgets for Elementor (free) |
| Sortable table, carousel, advanced filters, profile builder | Ultimate Member Widgets for Elementor (Pro) |
Why Build a Membership Website
An easily searchable WordPress user directory may significantly enhance the user experience. Allowing visitors to identify and connect with the people they are looking for. Membership sites offer an excellent opportunity to monetize your content, expertise, and even your time. By offering well-defined subscription plans at a fixed, recurring price, you can simplify billing processes and provide your customers with convenient access to your products and services on an ongoing basis. With Elementor, you can create a membership site for virtually any niche or purpose.
Live Demos
See every widget working live at demo.userelements.com:
- User Directory Grid
- User Profile Flip Cards
- Sortable User Table
- User Carousel
- Zigzag Layout
- 2-Column Layout
- 3-Column Layout
- Live Search
- Filter Buttons
- Faceted Search
Download free on WordPress.org | Get Pro
What is a WordPress Member Website
A WordPress membership site allows you to restrict access to some or all of your site’s content. Consider the scenario where you want only certain users to access your website. There won’t be a public entrance. Users typically have to register in order to access a member website or a particular section of it. Only users who have registered are able to log in, read the website’s content, and leave comments.
The advanced member website includes robust features such as setting a user profile photo, sending messages between members, push notifications, and many more.
What Types of WordPress Membership Sites Can You Build?
Here are some examples of Membership or user directories you can create:
- Alumni Directory – Make an alumni directory for the school that is only accessible to former students, staff, and professors.
- Church Directory – A directory of all the church’s members..
- Contractor Listings – Directory of independent or 3rd party contractors.
- Expert Directory – Directory for legal professionals, journalists, and conferences
- Corporate Directory – Developing a corporate team directory.
- Sports Directory – Directory of local high school basketball teams.
- Interest-based Community – Create a directory of Texas Mercedes-Benz owners.
Functionalities a WordPress user directory plugin offers
Good dynamic user directory WordPress plugins offer:
- User registration features
- User login features
- Individual User profile page
- User directory listings page
- Advanced user search features
- Custom fields for user info
- Let users send messages to each other
- Restrict content based on the member’s role